Optional vagrant setup
It is possible to use Vagrant for VM provisioning, however it is not necessary.
Find a guide on how to install it for your system here.
Once Vagrant is installed, create a Vagrant box for the operating system of choice. For this example we will be looking at a fedora 34 cloud image, however you can substitute any vagrant image of your choice.
First, navigate to the MicroShift directory on your host system, or another designated
directory where we will be storing the Vagrantfile.
Next, download the vagrant image. For this example we will use a fedora 34 cloud image:
vagrant box add fedora/34-cloud-base
Depending on the image, Vagrant will ask you to select a Virtualization provider, just select the first one.
Once that downloads, initialize the repository for launching your image:
vagrant init fedora/34-cloud-base
Running this command will create a Vagrantfile in your working directory which
is used to configure your vagrant box.
Before starting the Vagrant box, increase the amount of RAM available to the system.
To do this, edit the Vagrantfile and configure your provider settings to include
the following:
    config.vm.provider "libvirt" do |v|
        # provides 3GB of memory
        v.memory = 3072
        # for parallelization
        v.cpus = 2
    end
The value of config.vm.provider depends on the provider you selected when you
ran vagrant add earlier. For example, if you selected virtualbox then the first
line should be: config.vm.provider "virtualbox" do |v|
Now start the VM:
vagrant up
Once the VM is up, connect to it:
vagrant ssh
Once ssh'd into the vagrant instance, refer to the local build and install to begin local development.
(Extra Optional) Connecting VSCode to Vagrant
If using VSCode, you can connect to your vagrant box with a few extra steps.
Increasing Memory Requirements
Since VSCode leans more on the heavy side of development, the RAM usage on your Vagrant environment
can go up to 5GB, and therefore we will need to modify the Vagrantfile to
increase the amount of available RAM from 3GB to 5GB (or 6GB if you want to be safe).
To do this, set v.memory to the following in your Vagrantfile:
        # provides 5GB of memory
        v.memory = 5120
        # provides 6GB of memory
        v.memory = 6144
Setting up an SSH Profile
First we need to ask Vagrant for an SSH config file. From your host machine, run:
vagrant ssh-config > ssh-config.conf
You can edit the ssh-config.conf file to change the hostname from default to
vagrant to be more easily identifiable, but that's up to you. :)
Here's an example of a working SSH config file:
Host default
  HostName 127.0.0.1
  User vagrant
  Port 2222
  UserKnownHostsFile /dev/null
  StrictHostKeyChecking no
  PasswordAuthentication no
  IdentityFile /path/to/microshift/.vagrant/machines/default/virtualbox/private_key
  IdentitiesOnly yes
  LogLevel FATAL
Next, you'll want to install the Remote - SSH extension from the VSCode Marketplace
With the extension installed, you'll click on the green bottom in the bottom-left corner of VSCode to open a dropdown menu for SSH options:
Select the option to open an SSH configuration file:

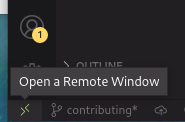
Next you'll want to navigate to the "Remote Explorer" tab on the left-hand side of VSCode, then select on the vagrant target (default if you haven't renamed it) and click on the button to connect to it in a remote window.
(Credits to Andrés Lopez for this guide: Connect Visual Studio Code with Vagrant in your local machine )
Now that the vagrant environment is setup, refer to the local build and install